
Overview:
When you are developing an application, your application may need to connect to multiple services by passing some connection information. Ideally every service will be protected in their own way. For example: Database. Database uses username and password to authenticate its users. So the application needs to have the username and password to securely connect to the database to consume its services. So in this context password can be considered as a secret which should be accessible to limited authorized people. Usually password is a part of connection string and connection string is being stored in the web.config.
The problem here is , password is being stored in plain text as part of connection string in web.config and web.config is a part of code so it will be associated with source control. So whoever has access to your source code, will also be having access to the database as well, Which is not desirable.
To resolve this issue, we have the option to encrypt the connection string in web.config. But secret is not limited to connection string only. As a developer, there are some sensitive information that you would want to protect in your code and encryption can not be applied to all of them. Usernames, passwords, encryption keys, API keys are some of the good examples of sensitive information. All these sensitive information can be categorized into 3 categories. i.e. Keys, Secrets and certificates and azure has a service named Azure Key Vault for securely storing and accessing these keys, secrets and certificates.
- Key: Most probably cryptographic keys used by other azure services such as “Always encrypted”(used in MS SQL) or “data encryption at rest” (used in azure storage).
- Secret: Any sensitive information that your application might need during run time. Eg Connection strings, usernames, passwords, API Keys
- Certificate: such as certificates for SSL/HTTPS communications.
We can also use key vault’s secret to store information which are more likely to change frequently (for example: service account passwords/Developer mail id/contact person). The up side of using key vault is, you do not need to deploy (means perform a build and release) your application every time the password is changed since it will not be part of the code. You can just update the value of that particular “secret” in the key vault and the application will start using the new value once the web app is restarted.
Another benefit of using key vault is versions. Key vault maintains all the previous versions of the secrets and keys so that you can refer to it if necessary.
Key vault comes in handy, when you either develop an application or migrating an existing application to azure, for storing the keys and connection strings instead of storing them in web.config as part of source control. In this blog, we will discuss about how to integrate key vault to our ASP.NET web application since most of the legacy application which are being migrated to cloud are created on ASP.NET .
If you want to learn in detail about key vault, more information is available here. https://docs.microsoft.com/en-us/azure/key-vault/key-vault-whatis
In this demo, we will do the following:
- Create a key vault.
- Create a ASP.NET web app
- Create a secret in the key vault.
- Give our application the necessary access to the key vault.
- Update the code to retrieve a secret from key vault.
Prerequisites:
- Azure subscription
- Visual Studio: I am using VS2019 for this demo.
Create a key vault:
- Log in to azure portal (https://portal.azure.com).
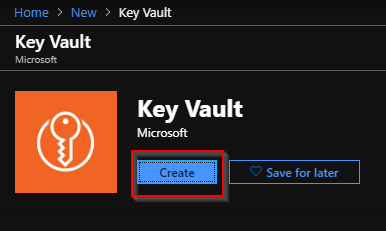
- Click on Create resource on the left side menu.

- Type in “key vault” in the search and press enter. Then click on create.
- Put in the available inputs from the dropdown and click on create
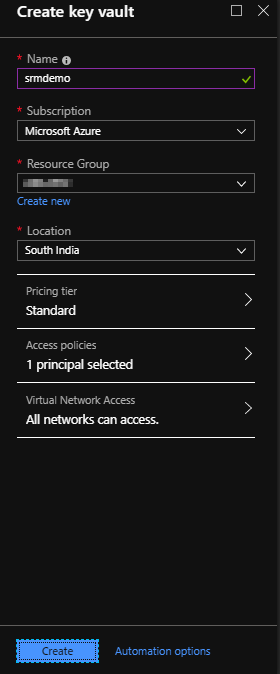
| Name | Name of your key vault needs to be unique. |
| Subscription | You will see whatever subscription is assigned to your account, in the drop down. Select one of them where your key vault needs to be created. |
| Resource group | you will see the resource groups that your account has access to and you need to choose one of them where your key vault will be created. You also have the option to create a new resource group if you do not have one already. |
| Location | Choose a location near to your/application users geographical location. |
| Pricing tier | There are 2 pricing tier available. One is A1 Standard which provides on Geo Availability feature and the other one is P1 premium subscription which provides one additional feature “HSM backed keys”. For our demo, please choose standard. |
| Access policies | By default, your account will be selected in the access policies. We will see how to add our application so that it can access the key vault, later part of the demo. |
| Virtual network access | You can specify if you want all network to access key vault or only selected few virtual networks. In this demo we will go with the first option. |
Once all the inputs are in place, click on create.
Create a ASP.NET web application
- Now we will create the web app. First of all, we will work with ASP.NET web application since most of the legacy application which are being migrated to cloud are ASP.NET web applications. If you already have an application you can skip the next few steps which takes care of creating a new application.
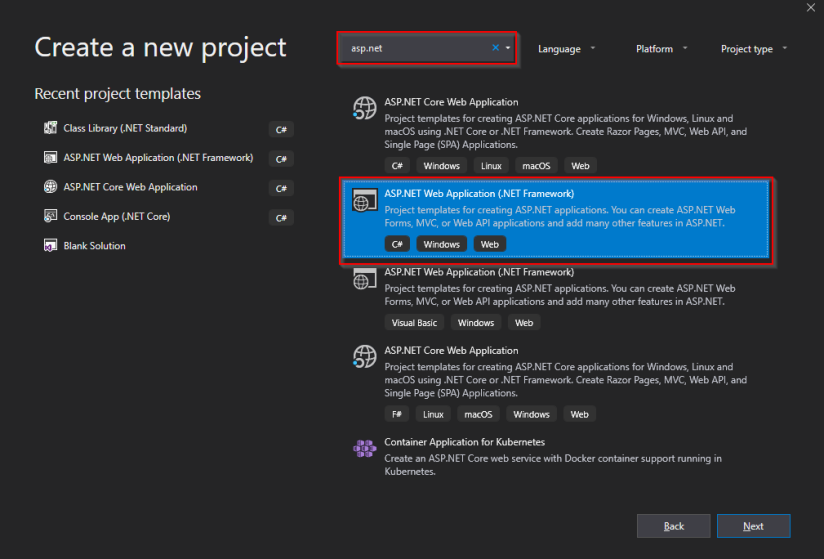
- Open Visual Studio and click on create new project.
- Search for ASP .NET and choose ASP.NET Web Application (.NET framework) and click on next.
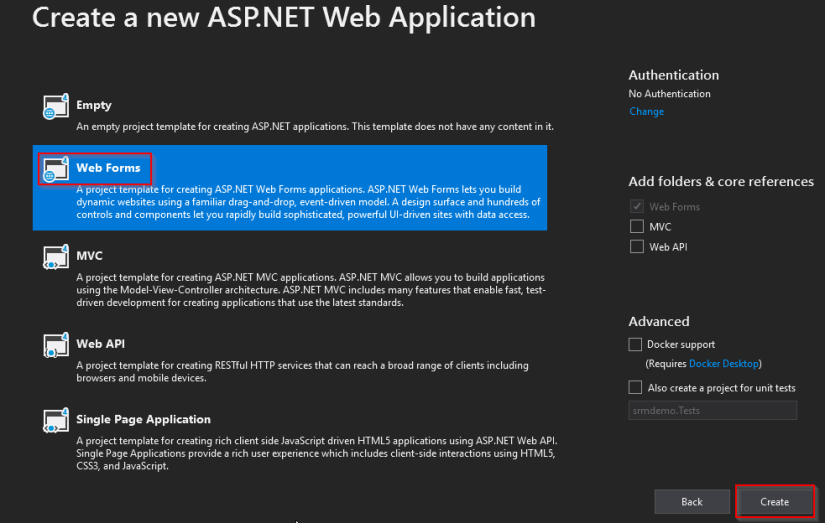
- Give a name to your application and fill the other fields if it is not filled automatically and click on create.

- Click on web forms and click on create.
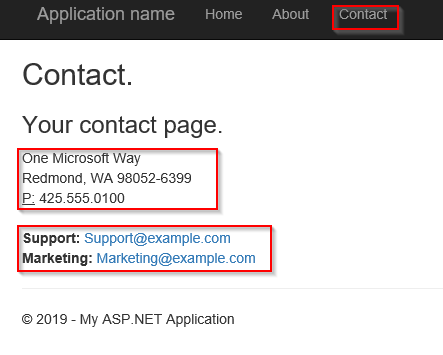
- Once the web app is created, run it. By default the contact page will be as below.
Add a secret in key vault
- The default application have hardcoded the address, support email id and marketing email id here. We will remove these hardcoded values from code and add them in the key vault and then we will retrieve these values from key vault.
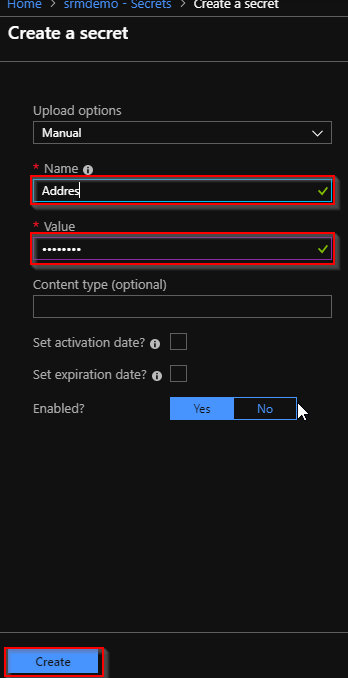
- Open Azure portal and go to your key vault. Click on secrets > generate/import
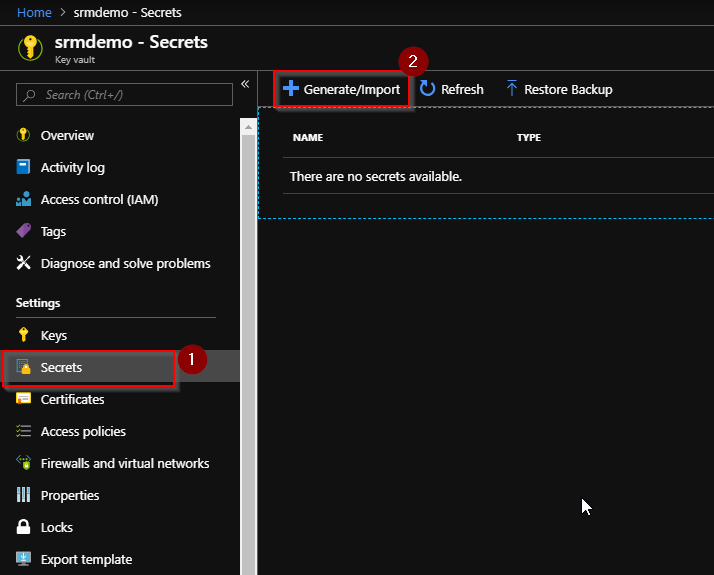
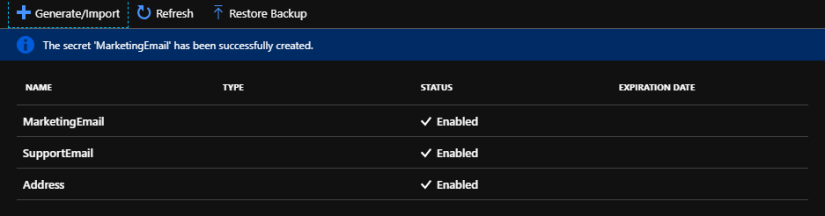
- Create 3 secrets as Address, SupportEmail and MarketingEmail in the vault. I have put the values of these secrets as KeyVaultAddress, KeyVaultSupportEmail, KeyVaultMarketingEmail respectively.
Give Key Vault access to your application
- If your application is not already registered in Azure Active directory, go to azure portal and click on Azure active directory > App registration > new application registration.

- Fill in the required fields and click on create.

- Note: If your project is in azure dev ops, the app registration will be automatically done when you create a service connection. And Sign-on URL is not needed for our demo but be careful while giving the URL when you work on actual project.
- Once your application is registered, you can go to key vault > access policies
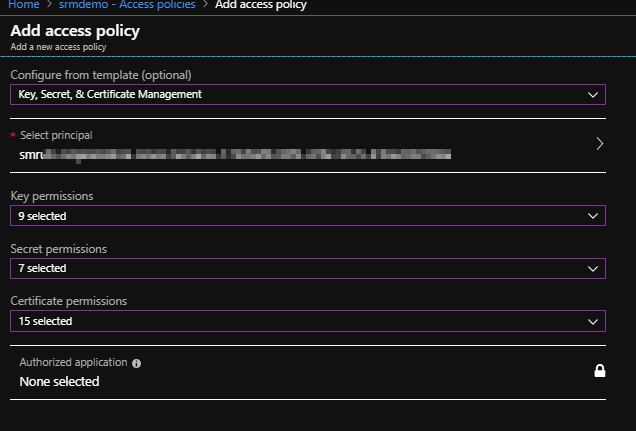
- All the values we need, will be populated by default. You just need to choose your application name from the “select the principal” dropdown. You can update the other fields as well based on your need. Once you click okay, your application will be added to the access policy of the key vault. Then click on save.
Update the code to retrieve secrets from key vault
Changes in Contact.aspx:
- We need to replace html anchor tags with asp:HyperLink tags so that they can be controlled from the code behind.
-
Before changes:
<address>
 One Microsoft Way<br />
 Redmond, WA 98052-6399<br />
<abbr title="Phone">P:</abbr>
425.555.0100
</address>
<address>
<strong>Support:</strong> <a href="mailto:Support@example.com">Support@example.com</a><br />
<strong>Marketing:</strong> <a href="mailto:Marketing@example.com">Marketing@example.com</a>
</address>
-
After changes:
<address>
 <asp:Label ID="lblAddress" runat="server"></asp:Label>
</address>
<address>
 <strong>Support:</strong>
 <asp:HyperLink ID="hyperlinkSupport"
                NavigateUrl="mailto:Support@example.com"
                Target="_new"
                runat="server" />
 <strong>Marketing:</strong>
 <asp:HyperLink ID="hyperlinkMarket"
                NavigateUrl="mailto:Market@example.com"
                Target="_new"
                runat="server" />
</address>
Changes in contact.aspx.cs
- Add the below lines in the pageload method to retrieve the secrets from key vault and update the address and email ids.
lblAddress.Text = KeyVaultService.Address;
hyperlinkMarket.Text = KeyVaultService.MarketingEmailID;
hyperlinkSupport.Text = KeyVaultService.SupportEmailID;
- KeyVaultService is static class which needs to have 3 variables such as Address, MarketingEmail and SupportEmail. We are going to create this class in next step.
Changes in KeyVaultService.cs
- It is a best practice to create a static class which will expose static methods to deal with the azure keyvault or any service for that matter. So that you can refer this static class and use its methods and variables directly to deal with azure services without creating any instance of that class.
- So right click on the solution and add a class library project named AzureServiceHelper. You can keep adding classes to this project for each service you are going to use.
- Then right click on this project and add a class file and name it as KeyVaultService. Make it a static class and add the 3 variables to it.
using Microsoft.IdentityModel.Clients.ActiveDirectory;
using System;
using System.Configuration;
using System.Threading.Tasks;

namespace AzureServiceHelper
{
 public static class KeyVaultService
 {
  public static string Address { get; set; }
  public static string MarketingEmailID { get; set; }
  public static string SupportEmailID { get; set; }
 }
}
- Then we need to install the below nuget package to this solution. Microsoft.IdentityModel.Clients.ActiveDirectory.
- To install a nuget package, write click on AzureServiceHelper project > manage nuget packages. Search for above package and install.
- Then add the below task to get the authorization token for the app to use Key Vault.
public static async Task<string> GetToken(string authority, string resource, string scope)
{
 var authContext = new AuthenticationContext(authority);
 ClientCredential clientCred = new ClientCredential(ConfigurationManager.AppSettings["ClientId"], ConfigurationManager.AppSettings["ClientSecret"]);
 AuthenticationResult AuthResult = await authContext.AcquireTokenAsync(resource, clientCred);
 if (AuthResult == null)
  throw new InvalidOperationException("Failed to Obtain JWT token.");
return AuthResult.AccessToken;
}
- The above method handles the authentication of your application to access the key vault service. It acquires the token using the client id and client secret of the application so that it can access the key vault using the token.
- Now that your KeyVaultService class is ready, add the reference of this project (AzureServiceHelper) to the web app project (srmdemo) and resolve the 3 error by adding using AzureServiceHelper; at the top of the contact.aspx.cs.
- You can see GetToken task is using two config values as ClientId and Client Secret. These 2 act like username and password for the application to access KeyVault. So let’s find the client id and client secret of our application.
- Client ID is nothing but the application id that you find in the app registration of your app in azure active directory.
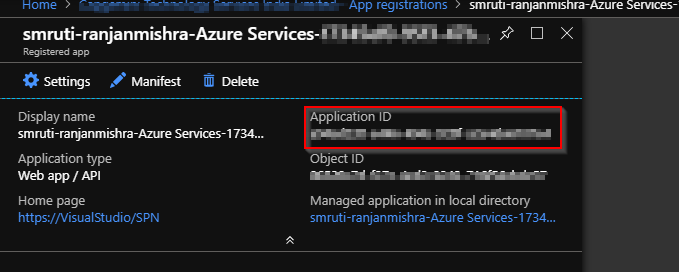
- If your application is not registered you need to register the application first in azure active directory.
- Client secret is a key in app registration which will be used by other services to authenticate the application. To create a client secret click on settings > Keys > Give a description of the key > provide the duration of the validation of that key > click on save. You will see the value of the key once it is saved. Make a note of that key since it will not be visible to users once it is created.

- Now add the client id (Application ID) and client secret (the newly generated key) in the web.config of the web app in the appsettings tag.
 <appSettings>
 <add key="ClientId" value="xxxxxxxx-xxxx-xxxx-xxxx-xxxxxxxxxxxx" />
 <add key="ClientSecret" value="xxxxxxxxxxxxxxxxxxxzi35IC8SOLayy2glVZ+CN1U=" />
 </appsettings>
Changes in global.asax
- The following lines will fetch the value of the secrets from key vault when the application starts.
- Add the following code in the application_start method in global.asax file.
- var kv = new KeyVaultClient(new KeyVaultClient.AuthenticationCallback(KeyVaultService.GetToken));
KeyVaultService.Address = kv.GetSecretAsync(WebConfigurationManager.AppSettings[“AddressURI”]).Result.Value;
KeyVaultService.SupportEmailID = kv.GetSecretAsync(WebConfigurationManager.AppSettings[“SupportEmailURI”]).Result.Value;
KeyVaultService.MarketingEmailID = kv.GetSecretAsync(WebConfigurationManager.AppSettings[“MarketingEmailURI”]).Result.Value; - And then remove the errors by installing Microsoft.azure.Keyvault Nuget package to the web app. And referring the AzureServiceHelper Project.
- As you can see there are 3 keys of web.config is being used here for the url of the secrets. Let’s add those keys in the web.config. You can find the urls of the secret in the key vault.
- Go to Key Vault > Secrets > Click on the secret which you need the URL of > Click on the current version of the secret > Copy the “secret identifier” value.
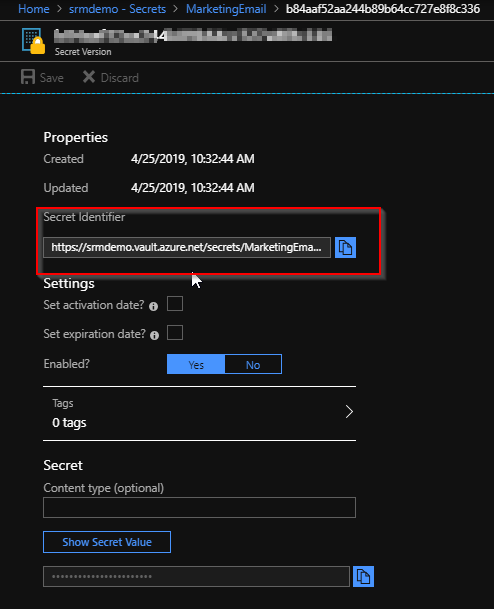
Note: https://srmdemo.vault.azure.net/secrets/MarketingEmail/b84aafewef52aas244b89ab64cc727e8f8c336
- Your secret identifier should look like the above URL.
- If you use this URL in your code, it will always point to this version of the secret no matter what. If you update the value of the secret, then also it will point to this older version of the secret because key vault has the versioning facility which saves all the previous versions of the secret.
- If you want to use the latest version always remove the version use the URL without the version info. e.g: https://srmdemo.vault.azure.net/secrets/MarketingEmail/
- Now add these values in the web.config in the app settings section.

- Now you can run the application and go to contact page to verify the result.
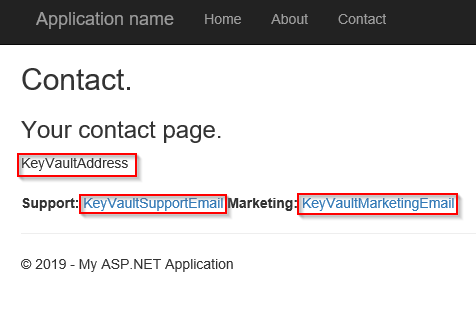
- As you can see all the 3 values that we were trying to get from key vault is populated here. This approach is ideal for setting up connection strings. Since we need the connection string when the application starts, we can use this approach to get the connection string at the Application_start method.
- You can very well add a static class in the web project itself and write custom methods to receive the “key name” as input parameter and return the key value from the key vault. The code should look like as given below. Choose your approach based on your need.
-
using Microsoft.Azure.KeyVault; using Microsoft.IdentityModel.Clients.ActiveDirectory; using System; using System.Configuration; using System.Threading.Tasks; using System.Web.Configuration; public static class KeyVault { public static async Task<string> GetToken(string authority, string resource, string scope) { var authContext = new AuthenticationContext(authority); ClientCredential clientCred = new ClientCredential(ConfigurationManager.AppSettings["ClientId"], ConfigurationManager.AppSettings["ClientSecret"]); AuthenticationResult AuthResult = await authContext.AcquireTokenAsync(resource, clientCred); if (AuthResult == null) throw new InvalidOperationException("Failed to Obtion JWT token."); return AuthResult.AccessToken; } public static string getSecret(string key) { var kv = new KeyVaultClient(new KeyVaultClient.AuthenticationCallback(KeyVaultService.GetToken)); return kv.GetSecretAsync(WebConfigurationManager.AppSettings[key]).Result.Value; } } - This blog talked about how we can use key vault in ASP.NET application since most of the legacy applications are in ASP.NET. Below links will be helpful for learning more about using key vault with .NET applications.
- Using Key Vault as connected service : https://docs.microsoft.com/en-us/azure/key-vault/vs-key-vault-add-connected-service
- Using Key Vault with ASP.NET Core : https://wakeupandcode.com/key-vault-for-asp-net-core-web-apps/
Happy learning. 🙂

Hi Smruti-
It’s a well narrated and informative blog. Also thank you for your time to clear my silly doubts too.
I would like to see more posts from your end.
LikeLiked by 1 person
Thanks for your feedback bibhuti.
LikeLike
Well written article
LikeLiked by 1 person
Thank you Kumar.
LikeLike