Overview:
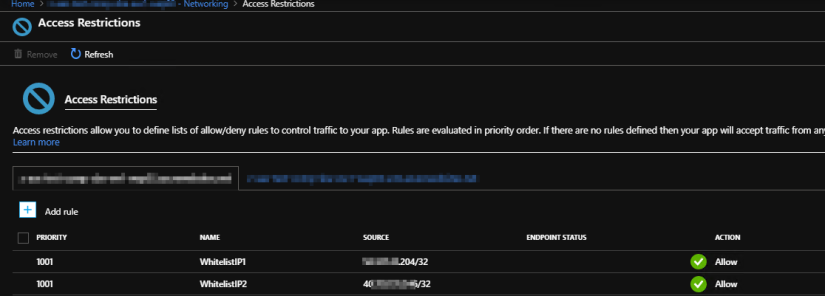
Azure Apps service has a feature which enables you to restrict user access to a web application using IP restriction feature.You can allow or deny the access to a set of IPs to your web app, using this feature.
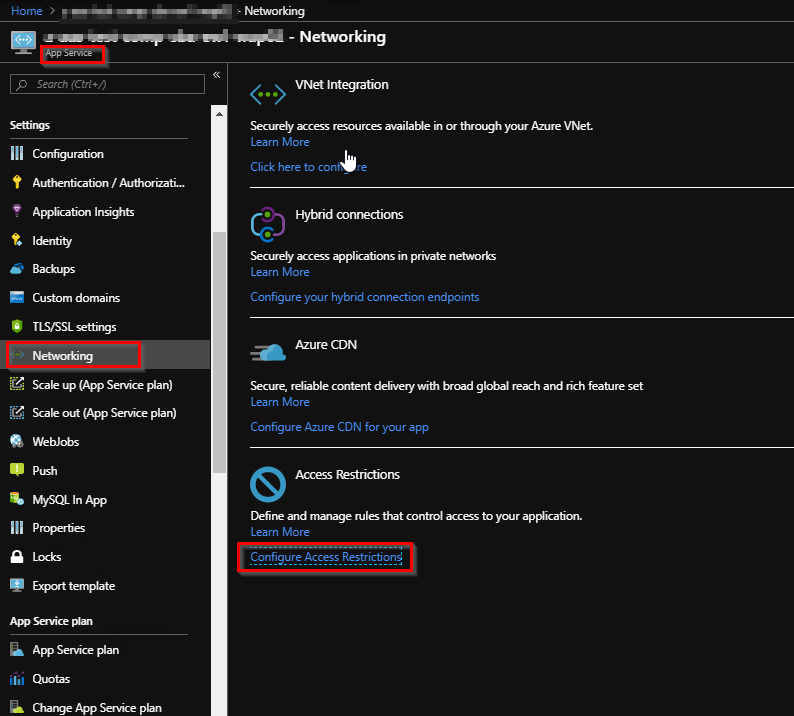
You can find this option by clicking on Networking >Configure Access Restrictions .
By default, it will apply the same restriction to the scm website as well.
Use Cases :
Below are the few use cases where you need to add IP restrictions.
- release agent IPs : When you automate the provisioning the azure resources through pipelines, sometimes, you need to white list the IP of the agent (the VM, in which the tasks are running) for running some tasks (for e.g. health check of website).
- Outbound IPs : When you have a web job associated with your web app, all the calls will be made by the outbound IP list available in the app service. In that case you need to white list the outbound IPs as well (Turning on Allow Azure IP option also works for this scenario).
- User IPs : If you want to provide access to different developers and testers, you need to white list their IPs.
You can run this powershell in your release pipeline once the web app is created. It will white list the IPs that you provide. You can add one pipeline variable to contain all the comma separated IP addresses and use that variable in the powershell task to pass the IPs to the script.
Parameters:
- RGName : Name of the Resource Group
- WebAppName : Name of the App Service
- priority : Priority of the IP restriction(e.g: 1001)
- IPList : list of comma separated IPs which needs to be white listed
Script:
Script 1 :
Param
(
# Name of the resource group that contains the App Service.
[Parameter(Mandatory=$true)]
$RGName,

# Name of your Web or API App.
[Parameter(Mandatory=$true)]
$WebAppName,

# priority value.
[Parameter(Mandatory=$true)]
$priority,

# WhitelistIp values.
[Parameter(Mandatory=$true)]
$IPList,

# rule to add.
[PSCustomObject]$rule


)
function Add-AzureIpRestrictionRule
{
$ApiVersions = Get-AzureRmResourceProvider -ProviderNamespace Microsoft.Web |
Select-Object -ExpandProperty ResourceTypes |
Where-Object ResourceTypeName -eq 'sites' |
Select-Object -ExpandProperty ApiVersions

$LatestApiVersion = $ApiVersions[0]

$WebAppConfig = Get-AzureRmResource -ResourceType 'Microsoft.Web/sites/config' -ResourceName $WebAppName -ResourceGroupName $RGName -ApiVersion $LatestApiVersion

$WebAppConfig.Properties.ipSecurityRestrictions = $WebAppConfig.Properties.ipSecurityRestrictions + @($rule) |
Group-Object name |
ForEach-Object { $_.Group | Select-Object -Last 1 }

Set-AzureRmResource -ResourceId $WebAppConfig.ResourceId -Properties $WebAppConfig.Properties -ApiVersion $LatestApiVersion -Force
}
$IPList= @($IPList-split ",")
Write-Host "IPList found "$IPList"."
$increment = 1
foreach ($element in $IPList)
{
if ($element -eq "" -OR $element -eq " ") {continue}
else
{
$element=$element.Trim()
$rule = [PSCustomObject]@{
ipAddress = "$($element)/32"
action = "Allow"
priority = "$priority"
name = "WhitelistIP"+ $increment}
$increment++
Add-AzureIpRestrictionRule -ResourceGroupName "$RGName" -AppServiceName "$WebAppName" -rule $rule
}
}
$OutboundIP = @(Get-AzureRmWebApp -Name "$WebAppName" -ResourceGroupName "$RGName").possibleOutboundIPAddresses -split ","
$increment = 1
foreach ($element in $OutboundIP)
{
$rule = [PSCustomObject]@{
ipAddress = "$($element)/32"
action = "Allow"
priority = "$priority"
name = "OutboundIP"+ $increment}
$increment++
Add-AzureIpRestrictionRule -ResourceGroupName "$RGName" -AppServiceName "$WebAppName" -rule $rule
}
This script is useful when you want to add less number of individual IP addresses.
If you have a large number of IP addresses, you can put them in a powershell script file(script 3) as a variable and call the below powershell file(script 2) which will add those IPs in the settings.
The reason we are using 2 powershell script is, script 4 may vary from one environment to other as it contains the list of IPs. So you may need to create multiple copies of script 3 based on environments (dev , test or prod). All those files can call script 2 to add the IPs to the access restriction rule. However, If you do not have any changes in list of IPs in any environment, you can put the “rules” custom object in script 2 itself and use it.
Sctipt 2:
Param(
[string]$WebAppName,
[string]$RGName,
[string]$resourceType='Microsoft.Web/sites/config',
[PSCustomObject] $rules
)

function AddRules($rules) {

$rules = @()
$priority = 100
foreach ($item in $rules) {

$rule = [PSCustomObject]@{ ipAddress = $item.ipAddress ; priority = $priority }

$rules += $rule
$priority = $priority + 100
}
return $rules
}

$ApiVersions = Get-AzureRmResourceProvider -ProviderNamespace Microsoft.Web |
Select-Object -ExpandProperty ResourceTypes |
Where-Object ResourceTypeName -eq 'sites' |
Select-Object -ExpandProperty ApiVersions

$LatestApiVersion = $ApiVersions[0]

# Registering IPs
Write-Host 'Registering IPs...'

$Settings = Get-AzureRMResource -ResourceName $WebAppName -ResourceType $resourceType -ResourceGroupName $RGName -ApiVersion $LatestApiVersion

$Settings.Properties.ipSecurityRestrictions = AddRules -rules $rules

Set-AzureRmResource -ResourceId $Settings.ResourceId -Properties $Settings.Properties -ApiVersion $LatestApiVersion -Force

Write-Host -ForegroundColor "Green" "IP range Added successfully!"
Script 3:
Param
(
# Name of the resource group that contains the App Service.
[Parameter(Mandatory=$true)]
$RGName,

# Name of your Web or API App.
[Parameter(Mandatory=$true)]
$WebAppName,

# subscriptionId value.
[Parameter(Mandatory=$true)]
$InputFile
)
[PSCustomObject]$rules =
@{ipAddress = "XXX.XX.2.XXX/32"},`
@{ipAddress = "XXX.XX.2.XXX/32"},`
@{ipAddress = "XX.XXX.XX.XXX/32"},`
@{ipAddress = "XXX.X.3X.22X/32"},`
@{ipAddress = "2X3.22X.XXX.XXX/32"},`
@{ipAddress = "2X3.22X.XXX.XXX/32"},`
@{ipAddress = "XXX.XX.2.XX/32"},`
@{ipAddress = "2X3.22X.XXX.XXX/32"},`
@{ipAddress = "2XX.XXX.XXX.XXX/32"},`
@{ipAddress = "2XX.X2X.XXX.2XX/32"},`
@{ipAddress = "XX.X2.XX.XX/32"},`
@{ipAddress = "XX.3X.X2X.2X2/32"},`
@{ipAddress = "XX.33.2XX.XX3/32"},`
@{ipAddress = "XX.XX.XX.2X3/32"},`
@{ipAddress = "X3.XX.X.XXX/32"},`
@{ipAddress = "2X2.XXX.X2.XX/32"},`
@{ipAddress = "2XX.X2X.XX.XXX/32"},`
@{ipAddress = "XX.XXX.X2X.XX/32"}

Write-Host 'PRODUCTION SLOT IPs...'
& $InputFile -WebAppName $WebAppName -resourceGroupName $RGName -rules $rules
Write-Host 'STAGING SLOT IPs...'
& $InputFile -WebAppName $WebAppName/Staging -resourceGroupName $RGName -rules $rules -resourceType Microsoft.Web/sites/slots/config
This is just a demo. You may need to change your script based on your need. Hope it helps. Happy learning. 🙂


